Getting started to … Q&A

In the comments of the past 2 tutorial articles we collected some questions. Admittedly it took a bit longer to prepare the answers, but I hope they satisfy. It’s not easy to give a straight clear answer without knowing how much basics we can assume. So we try to give pointers and if you we talk about stuff you don’t get. Ask again. Please note, we will never give a click-by-click explanation. 😉

How to map engine parts (like tubes and other parts…)??

Use the UVW Mapping tools in 3ds max. For tubes I would recommend the pelt mapping method using seams. Also you can create those tubes or wires using splines and let 3ds max create the shape and mapping.

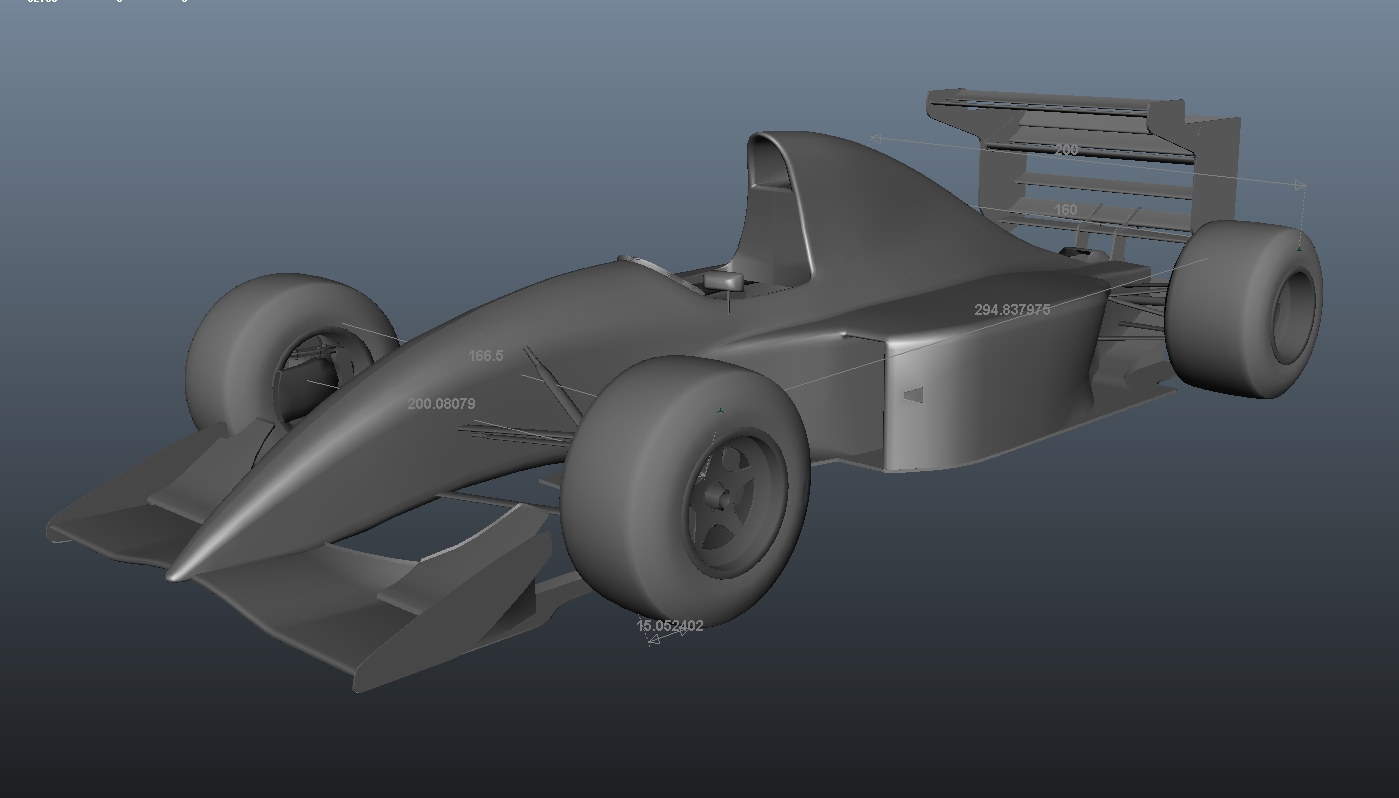
To generate LOD B and LOD C i must start from zero, decrease manually from LOD A or have some script/tool to easily do that?

There are several ways of poly-reduction. You can use poly-reduction modifier (called multires) in 3ds max, you can use the poly reduce modifier in XSI or the reduce option in maya. All of them have their benefits and flaws. The best and most efficient way is still to do it by hand. Then you can decide where to reduce the polys and where you want to spent more polygons. Usually I would suggest to combine both variants. Doing it by hand for LOD B maybe and use some of the automatic methods to generate LOD C.

I’m an expert on Solidworks (I’m curious about did you hear anything about this software. It’s an engineering CAD program) and I model the cars on solidworks. Is it possible to use this models in a game? (like rFactor or any other)

Theoretically it is possible. But you’re using a CAD engineering tool and therefore you create your objects in NURBS. To get a polygon model, you have to tesselate and convert the nurbs into polygons.You can do that with stand alone Tools as Rhinoceros, VRED, Autodesk Showcase, or with special plugins for 3ds max & maya (like N-Power Translator), or you use RTT DeltaGen (that’s the best but the most expensive solution).

No matter which application you use to tesselate the NURBS, you will always struggle with the polycount. So you either reuse the CAD as base for a polygon model and do further reducing by hand, or you remodel it using the CAD as base. You can put a CAD part straight into rFactor, but you have to live with some limitations like low fps and/or tesselation quality issues.

Concerning finding the right logos – you say to never upscale a logo to make it larger. If you have a logo that is too small and need it larger, will you go about re-drawing the logo itself in vectors, or do you use another method?

We use all 3 methods. First we have a look in our private shared logo collections. Many companies have been sponsoring for years and chances are high somebody within the team already found the necessary logo. Obviously this does not help you. First stop are sites like BrandsOfTheWorld.com or Vector-Logotypes. Both are public resources for vector logos. BOTW has seen its best days several years ago and before they took down most commercial logos. Try to look for press or media kits of a company. They often include vectorized logos.

If you can’t find it as vector, there are a few very nice places to visit and nicely ask. I can promote the GrandPrixGames forums, where they always have a public thread to share requested logos. Great guys! This is a good start for modern and topical logos.

Google Image Search can be a help, too.

Another nice trick is to look for company press statements with the official PDF-styles. PDF are usually vectors, so you can zoom in to a logo and grab a screenshot to work from. Same applies for fonts, if you can’t find the font online, or can’t get the commercial version. If you need it badly you can actually decompile the PDF and extract some raw data like fonts, look for Fontforge.

If nothing helps, you have to reconstruct it. When you can’t avoid this, do it right and do it as vectors. Some like to do it in Adobe Illustrator, I think Inkscape (Open Source) suffices. It’s easy for simple monochrome logos and gets tougher the more colors and effects you have.

Most Vector software has a way to vectorize logos. If you have highres-graphics you can vectorize them. However, for small logos or Logos based off images, this isn’t very practical.

Lastly, don’t be a prick, share logos so everyone can benefit.

We accept more questions and we will post more how-to-get-started-into-modding tutorials in the upcoming weeks. Post your questions in the comments.

Getting started to … Texture

Number two in our series of Tutorials to get you started into Modding. Today our topic is textures.

How do I start?

Compared to modeling, creating textures is rather simple and all good modding teams provide templates to get you started painting car designs. This is a rather autodidact approach, but a valuable nonetheless.

Turns out there are very few dedicated tutorials for car painting. They all require some basic understanding of Photoshop.

What’s next?

Get cracking and get experienced.
Be flexible in your approach to painting.
Before I repeat more platitudes, let’s get to some special skills that have a lot of potential and aren’t used very widely so far.

Using vectors

Textures are pixel-based with discrete width and heights, however Photoshop offers neat vector functionality. Instead of drawing lines, you can set up vector paths, that describe the areas and lines of the car design. Those lines are as smooth as can be and it’s very easy to change lines. With painted pixels scaling and distortion becomes very tedious and you lose a lot of quality. Instead, you can change the path and the affected area updates automatically.

One of the difficulties of painting are the edges between mapping surfaces. These seems can become tedious, especially if you have a logo that goes right across such a seam. This seperates the skilled painter from the lazy one. The latter tries to work around those bits and rather puts the logo someplace else instead of positioning it correctly. The same can be applied on design lines. Using vectors helps tremendously as you can work more exact – and again, change lines without quality loss.

Working with Vectors can be a bit messy in Photoshop and it takes some time to get used to it, admittedly. However, the benefits outweigh this by far.

Scripting

Imagine the situation the 2D artists had with the 2006 mod. Each car had 3 textures, each had roughly 50 layers with all designs and logos for 10 track variants on average. The effort of saving each texture variant, each shader maps was quite large and it quickly becomes a boring, repetitious and error-prone process. For the 1994 mod, we will do it differently using a method we should have looked into a long time ago.

Photoshop supports scripting. You can use Javascript to write linear workflows to create a build script for your texture.
This script switches defined layers on and off and specified states to files. The script is rather simple, the execution is still slow, but it far beets the manual work.
In case of our Ligier, the result are 16 texture files in TGA format. Saving right to DDS does not work, as the nvidia plugins can not be used in the script. To convert all TGA files to DDS you can use Dropps, part of my DDS-Utils. This will convert all files in one batch based on the predefined settings.

Scripting has been one major improvement of our workflow at CTDP.

No-Gos

At last, some no-gos we suggest you never do.

A difficult part about skinning a car is finding the right logos. And even more difficult: finding them in a suitable size and format. We have this problem very often working on F1 1994, especially with the smaller teams like Larrousse or Pacific. They had many sponsors, for which it is impossible to find proper logos on the internet. However, you should never ever resize a small logo to make it bigger. It will hurt the quality and leave you to ridicule.

Something else to be concerned about are the alpha channels. Alpha layers determine the amount of reflection on a certain part of the texture. Generally, the alpha layer has the same mapping as the texture. Alpha channels are greyscale only and do not support colors. The general rule is: the darker an area on the alpha layer is, the less light does it reflect. So, black will cause no reflection at all; white will mean the biggest possible reflection and is in most cases completely useless. The more reflection you have, the less you will see ingame of your actual car livery. See also this tutorial teaching what’s up with alpha channels in rFactor.

We take questions! If you are stuck with a problem or have questions related to modeling or textures ask them and we will adress them in a future post here on the blog.


Jordan 1994 WIP

While Stefan is working on Larrousse, Andreas ‘Neidryder’ Neidhardt continued to work on the Jordan. The basic shape of the car is done and we are tweaking details on the carbody. However the suspensions you see are still placeholders and will be replaced this weekend.

In other news, James Bendy finished work on the Ferrari textures for now. He’ll paint the Jordan next. Larrousse will be painted by Dennis ‘mediocre’ Schmidt.

Dress

It’s been more than 4 years since our last big redesign of our website. All of the team loved the gritty-used paper look and it took quite some convincing to move to something new hopefully equally likable, while at the same time practical website. I hope everyone enjoys it as much as we. Right now there are no new contents, hopefully this will change soon. 🙂

Also we opened up a flattr-account, but more about this some other time.

Larrousse 1994 WIP – an ontological paradox

Fabian was right, the car in the last post was the Larrousse 1994. A totally unremarkable car and the only thing worth noting is, that it drove with 2 very distinct liveries in the first 4 races, which Dennis ‘mediocre’ Schmidt is going to paint later.

Today erale frightened me. He said he had finished the model for Larrouse. I didn’t believe him, since Ferrari took several month to finish and you just don’t build cars in 3 days anymore. He said his time machine finally worked and he traveled into the future to take the final model back to the present. Now, what bothers me are two things: first, why didn’t he go to even further into the future to bring back a mapped model (erale claims he had only Plutonium for one trip, but we all know Mr Fusion will be available for domestic use within 4 years!) and secondly, assuming erale never deletes the model by accident and keeps the file till the end, who actually build the model? And if it has mistakes, can I blame the universe?

Anyway, erale got so scared by this onthological paradox, that he deleted the model to build it himself. Here are the surviving photos of the future finished car. Hope posting this doesn’t rip open the space-time-continuum, AGAIN!